
Fancy Melt and Pour Soap Making. Adding a floral touch to your melt and pour soap is a delightful way to make your soap look more sophisticated and beautiful. Don’t worry, flower soap embeds are not as complicated as you think. In this article, I will show simple steps on how to make a flower embed melt and pour soap.
Ingredients
- 7 oz Shea Butter Melt and Pour Soap Base enough to fill molds
- Micas for colors
- 5mL of Fragrance Oil suitable for soap making
Step 1: Prepare the Ingredients and Equipment
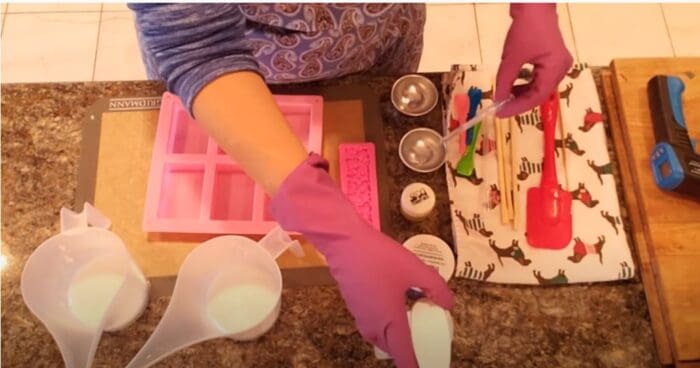
In this DIY soap design, you will need a rectangular melt and pour soap mold and a silicone flower strip mold. For the soap colorants, you can choose micas with your favorite colors. A combination of two colors is recommended. In the video, I used yellow and purple micas. You will also need two funnel cups with 7 ounces of shea butter melt and pour soap base, gloves, a digital infrared thermometer, alcohol, fragrance oil, a spatula with a removable handle if possible, 3 small spatulas or teaspoons, and some bamboo skewers or chop sticks for mixing.
Step 2: Create the First Soap Colorant
With your gloves on, melt the two 7 ounces of shea butter melt and pour bases in the funnel cups until they reach about 170 degrees Fahrenheit. Then, leave them on the side and start making your first soap colorant. To prevent a speckled effect on the bottom of the soap, spray some alcohol on the mica powder. Mix the mica powder with the alcohol before you pour it into the melted soap base. Pour the mica into the melted soap base and mix thoroughly. Add more micas of the same color until you achieve your preferred shade.
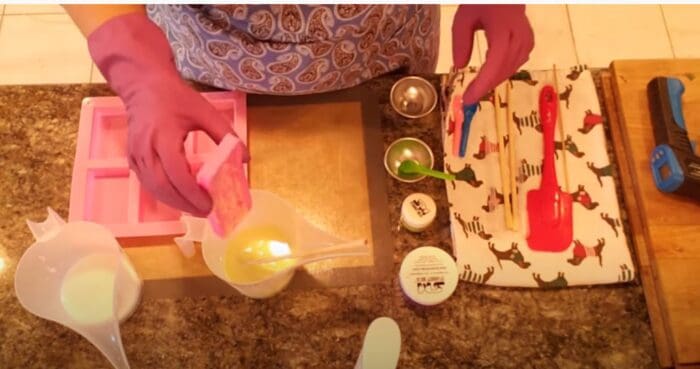
Step 3: Pour into the Flower Mold
It’s time to make your strip of little flowers! Simply pour the melted soap into the flower strip mold. Move the mold around until the whole mold is covered with melted soap. Then, let it drip on top of the funnel cup. Set the mold aside and let it cool.
Step 4: Make the Second Soap Colorant
Repeat the process of making the soap colorant for the second color of your choice (see step 2). Mix this color into the second cup containing the melted shea butter soap base. Let the two cups of colored soap cool down to about 140 degrees Fahrenheit. Spray a bit of alcohol on the flower strip mold, and pour the second soap mixture. Leave it and start working on your rectangular mold.
Step 5: Use the Rectangular Soap Mold
Add about 3mL of fragrance oil into the melted soap mixtures. Pour the mixtures slowly into each cavity of the rectangular soap mold, one after the other to create a tie-dye effect. Squirt some alcohol on the top to get rid of bubbles. Remember, be creative! You can use the skewers to create some swirls, circles, or any other shapes.

Step 6: Combine the Flowers and Soap Bars
Once it has cooled down, unmold the flower strip carefully. When the soap bars are completely formed, unmold them as well. Cut the flower strip in half. Then, use a skewer to create gentle scratches on the bottom of the flower strip and the top of the soap bar to ensure adherence. To glue the flower strip on the soap bar, melt the remaining soap mixture in the funnel cup until you reach about 145 degrees Fahrenheit. In a straight line, pour the mixture slowly onto the middle of the soap bar. Put the flower strip on the top and press gently. Allow it to settle for a few minutes… and you’re done! Enjoy your lovely flower embed melt and pour soap.
Here’s a link to the video on how to make the flower embed melt and pour soap:

Thank you, so very much, for all of your imaginative videos for melt and pour soap designs. I started my, DIY, candle, and soap product business a few years ago. I’ve used so many of your great ideas as well as learning so many different techniques. Please keep them coming.
I am creating favors for two more bridal showers this coming month and you have helped me to create some of the most amazing gifts for the guests, based on the party theme.
Maureen