Melt and Pour Soap Designs Using Delicate Embeds
I have always found really nice fondant mats that would have been nice to add to my melt and pour soap designs as an embed.
The problem was, I could never get them to work right. I have tried to put them in the freezer and multiple other techniques and for some reason I could just never get the design to come out with my melt and pour soap. They would tear and warp and basically become unusable in the soap.
I have found two different ways to make this work for melt and pour soap.
The supplies that I use for these techniques are a silicone cooking mat. This type of mat helps grab the soap as you gently work with it and a flexible spatula.
Technique Number 1
In the first technique, you will grab your fondant mold and pour your soap onto the mold. You will then need to squeegee off the excess soap. It is important that for both of these techniques, that you use a spatula that is not too rigid it must have some give to it so that it does not wipe the soap out of the mold.
I have found that the dollar store usually has these great little spatulas that will actually disengage at the head. But, you can use flexible instrument that has some give to it.
Once you have squeegeed the excess soap off the mold, you are then going to go ahead and just let it sit and set. This should not take more than about 15 – 30 minutes.
When you are ready to unmold you will need to place the soap upside down on top of the silicone mat. It is important that it is a silicone mat so that there is some grab when you are unmolding the soap.
Place the soap face down on the silicone mat and then very gently start to pull up at the edge of the mold. You should be pulling up very slowly and carefully with one hand while holding down the mold with the other hand. This will have the soap stick to the mat as you are pulling up.
This is a great technique for fondant molds that are just a little bit thicker.
Again, there is no need to stick this in the freezer while you are waiting for it to set it should take no more than 15 to 30 minutes before unmolding.
Techniques Number 2
The second technique is for fondant molds that are very delicate and maybe very shallow. You will see these types of molds with very intricate lace designs.
This can be a little bit trickier as there are a lot of fine lines in the fondant mold itself. The soap can easily pull apart when you are trying to unmold as we did with the larger fondant mat in the above example.
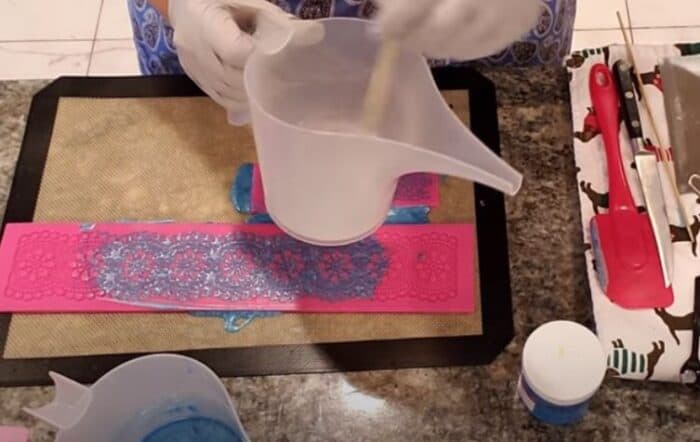
The trick here, is a little different. Using a funnel cup pour the soap into the mold, you need to squeegee it out very gently, because the mold is so shallow you could actually pull the soap right out of it.
Squeegee the soap very gently let it dry completely this should also take about 15 to 30 minutes.
At this point, take a clear melt and pour soap base and make sure it is cooled down too about 120 degrees Fahrenheit. you want to get this base still fluid without skin if possible.
However, you do not want it to be so warm that it melts the soap that is in the fondant mold. Once you have the clear melt and pour soap base at around 120 degrees Fahrenheit or lower if possible without a skin you can go ahead and pour it on top of the soap that’s in the fondant mat you need to let this dry do not squeegee this let it dry.
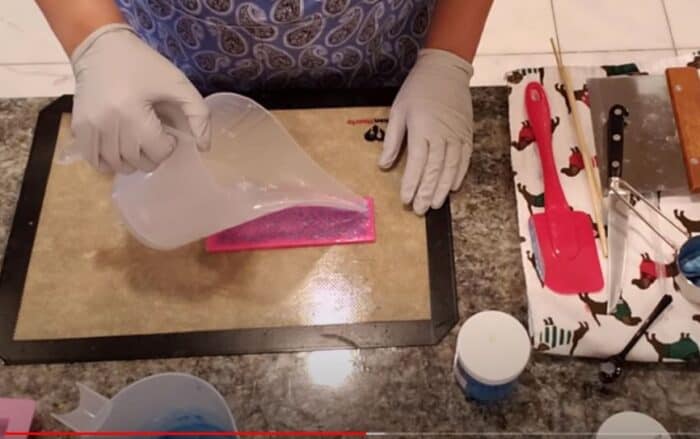
Once the clear melt and pour soap is dry and no longer warm to touch you can now turn this mold upside down onto your silicone baking mat. Next, you will do the same technique as you did with the first example you’re going to hold the mold upside down you’re going to press it just gently into the silicone mat you will then grab one end while pushing down on the mat with your other hand and you are going to pull up very gently.
Making A Melt and Pour Soap Design
For the next step, we will now make some, melt and pour soap. We need to make sure that both embeds are completely dry and set they cannot be warm in any way.
We will now grab our trusty pink six cavity mold and get our crystal-clear melt and pour soap ready.
Melt the crystal-clear melt and pour soap base in the microwave at 10 second spurts making sure to not overheat. Once it is melted completely, you can add a small amount of bio glitter if you prefer to the clear base.
It is important that you do not add any fragrance or colorant to the clear melt and pour base.
Once the clear melt and pour is at a temperature of 130 degrees Fahrenheit or less you can go ahead and Pour a small amount into the mold. At this point you can add the embed and press it down to make sure that it is all the way to the bottom. Then spray generously with alcohol to get rid of any air bubbles.
If your lace molding is larger than your pink cavity in your mold, then you can go ahead and cut it down to size.
It does not matter if you pour a little bit of clear melt and pour first or if you place the molding in first as long as you spray with a generous amount of alcohol. This will help the layers adhere to each other.
I only fill the pink mold about halfway with clear melt and pour. Let it set and dry. Next, we will grab either my Shea butter melt and pour soap base or my goats milk melt and pour soap base. Melt in the microwave in short 10 second spurts until fully melted. It is important to not overheat the soap base. Wait until the base is at a temperature of 130 degrees Fahrenheit or less that way it does not pop through the clear melt and pour.
Before you pour, make small hatch marks on your soap that is already set in the mold, then spray with alcohol to make the layers stick to each other.
Let completely set and dry, then unmold.
I hope this helps you with some of your fondant lace molds that you want to use for your melt and pour soap I have included a video that shows this process in detail.
Happy soaping.

I was a little unsure of myself after receiving the molds. With the tutorial I feel a lot more confident. and will definitely go try this right now before i forget how to make them.
Thank you, Anna
You will do great.